Why pay a service technician to repair your air/water syringe when it only takes a few minutes to accomplish? Here are some simple ways to keep your costs down by learning how to do a simple repair by yourself.
Diagnose Your Syringe
A worn air or water button or valve core is the most common cause of air or water flow failing to cease (leak) when the button is released. In such a case, simply replacing the worn button and/or valve core is in order. You will have to remove the old button(s) from your syringe. Buttons are held in many different ways – a quick examination will allow you to determine if they are:
- Held in by a retaining pin, which runs through the head of the syringe from side to side- very common on most of today’s syringes.
- Held in by friction- no other apparent methods of retention.
- Threaded- there will be flat sides directly below the “cap” of the button onto which you could put an open-end wrench.
There are a few other variations (e.g. A-dec has a syringe that has a small screw between the buttons). Make certain any retainers (pins, screws, etc.) are removed before you attempt to pull your buttons out. Always be certain to turn your unit off and depress the buttons to exhaust the line pressure before working on your syringes.
There are many styles of buttons for the many brands and models of syringes produced over the years. To find a match, remove your button and compare it to the pictures in our catalog or on our website to find the correct replacement.
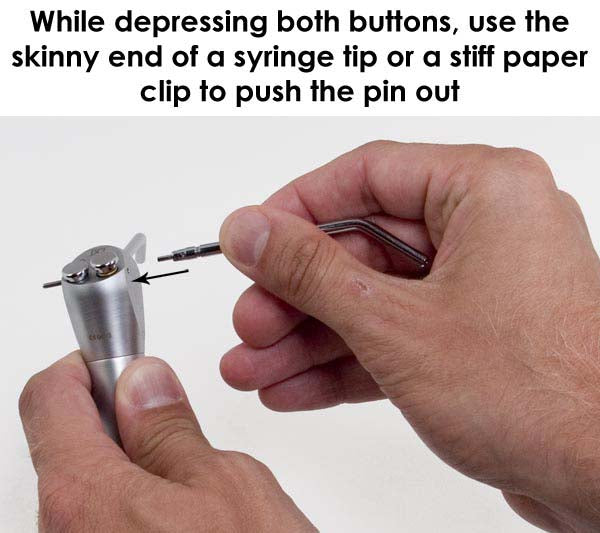
If you have the style of syringe with a retaining pin, push down both of the buttons and use the skinny end of a metallic syringe tip or a stiff paper clip to push the pin out. Once you have gotten the pin partially out, you may use a pliers to pull the pin the rest of the way out. If you do not hold the buttons down while removing/replacing the pin, you will damage the button or the o-rings on the button. Many buttons have a spring underneath, be careful not to lose it.
A worn out valve core can cause leaks in an air/water syringe. A valve core is similar to the valve you would see on a tire inner tube. The buttons that work with a valve core are generally shorter and will have only one o-ring. You will need a valve core wrench to remove the valve core as they screw into the air or water chamber of the syringe head.
Your syringe may also leak if the air or water pressure going to your unit is incorrect. Make sure the air pressure is set at 80 PSI and the water pressure is set at 40 PSI at your junction box (see tech tip 23 for more information on utility centers). A good way to test if your water pressure is too high is to push the syringe water button and see if the water squirts farther than 4 feet (1 foot per 10 PSI). If it does, you need to turn down the water pressure. Making sure your air and water pressures are set correctly will help to ensure the proper performance not only of your syringes, but your entire dental unit. See our issue on pneumatics for more information on pressure.
After replacing a button or valve core, reassemble your syringe, turn your unit back on and test for proper function.
Wait! There is more! Please be sure to catch Syringe Repair – Part 2 in our next Practice Tips, where we will discuss how to correct leakage around the various orifices of the syringe, including how to fix that annoying spurt of water that sometimes happens when you press your air button.


Thank you for a fantastic Part 1 tip off. However my syringe leaks when water button is pushed. Could the cause be the worn out valve core?
LEAVE A REPLY