Setting up an air line for a sand blaster or MicroEtcher is a very simple process. You only need a few parts to get the job done. The location where you have chosen to hook up the sand blaster dictates which parts you need.
Common Sand Blaster Hook Up Options:

#1 - Chairside
- Attach your sandblaster to the main air line coming from the junction box, or the incoming air line to your dental unit.
- Splice (cut) the main airline and install a threaded multi-port barb tee (such as #14-61). This connector is a good tee to use, as it contains both large and small barbs to accommodate either 1/8" o.d. (outside diameter) or 1/4" o.d. supply tubing. In most cases, the main air line will have a 1/4" o.d.
- Install a female quick disconnect with shut-off with a 1/4" mating diameter. The shut-off feature is necessary to stop the air flow when you disconnect your sand blaster. We recommend either #13-06, which has a compression fitting that works with 1/4" o.d. tubing, or #13-05 (it comes with both large and small barb fittings). You'll also need a length of tubing (#11-55 or #11-56) to connect to the tee and to the quick disconnect. For more information on adding a female tee, see Practice Tips issues #4 and #49.
- Once attached to the tubing, the female quick disconnect can be mounted in an open 1/2" diameter port on your dental unit or in an under counter bracket mount (#05-90, #05-91, or #05-92).
- Attach a 1/4" male quick disconnect (#13-11) to the tubing connected to your MicroEtcher and installation will be complete.

#2 - Handpiece Line
- A simple hook-up option is to connect your sand blaster directly to an open handpiece line. Our 4-hole handpiece connector (#14-77) will replace both the male and female quick disconnects, as well as the need to splice into your air line.
- Simply attach the barb end of the connector to the sand blaster tubing. Then you can attach the 4-hole connector end to any open handpiece position on your dental unit and installation will be complete.
- Something to keep in mind is that a MicroEtcher or sand blaster typically requires air pressure between 50 and 120 PSI to operate correctly. You may find a significant reduction in sand blasting performance with pressures under 60 PSI. If you are using a 4-hole handpiece adaptor, you will need to adjust your dental unit's handpiece air pressure.
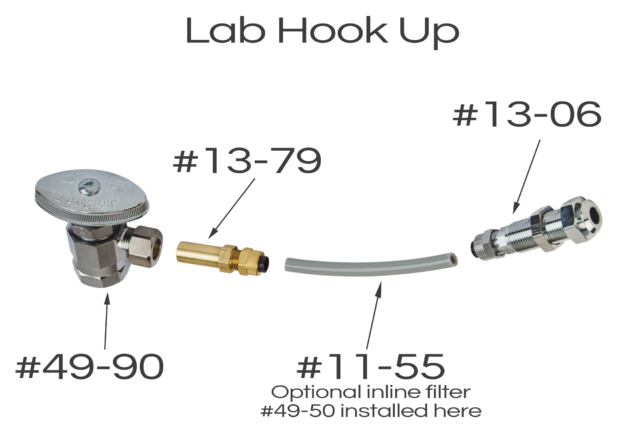
#3 - Lab Hook Up
- You may connect directly to an air outlet in your lab with minimal parts. The air that comes through the manual shut off (#49-90) from your compressor typically will be anywhere from 80 - 100 PSI.
- Our 1/4" compression connector with 3/8" nipple fitting (#13-79) installs directly into the manual shut off.
- Attach an appropriate length of 1/4" o.d. supply tubing (#11-55) to the compression end of the fitting.
- Attach a 1/4" female quick disconnect with shut off to the open end of the tubing (#13-06).
- Attach a 1/4" male quick disconnect (#13-11) to the tubing connector of your sand blaster and installation will be complete.
- It is important to consider large particles and moisture in a direct connection to the air line. They can clog a sand blaster, so an inline filter is recommended (#49-50). This filter can be placed inline on the 1/4" o.d. tubing listed above.
There are several additional hook up options that involve regulators and tees for adding more than one air driven accessory. If your job is more involved, please don't hesitate to give one of our friendly technicians a call for assistance. We'll have you sandblasting away in no time!
LEAVE A REPLY